Adding a province
1. Add a new province shape with a unique colour to the provinces.png file
2. Add the RGB values to the map_data/definition.csv file, with a new province number
3.1. If the province is not impassable: Add it to an area in map_data/areas.txt, if the area is new add the area to a region (map_data/regions.txt)
3.2. If the province is impassable: Add it to the impassable's list in map_data/default.map
4. Give the province setup data in setup/provinces/yourfile.txt
5. Add locators in-game using the console commands:
mapobjects.generategamelocators fort
mapobjects.generategamelocators city
mapobjects.generategamelocators combat
mapobjects.generategamelocators port
mapobjects.generategamelocators unit_stack
Once locators have been generated, they will be saved in your documents/imperator/generated folder. Move them into your mod folder's gfx/map/map_object_data/ folder and rename them to correspond with the vanilla locator files.
Surround Map
The Surround Mask controls how the clouds around the map look. The file that controls this can be found in gfx/map/surround_map/surround_mask.dds.
To make your own Surround Mask you need to open the surround_mask.dds in your favourite graphic editor. For this guide I use Photoshop CC 2018. The surround mask file is half the size of the provinces.bmp file. You can make the mask by guessing where the clouds should be or you can use your provinces.bmp to guide you in this process. For this guide I will use my provinces.bmp so I can make the cloud mask more precise.
Creating the Surround Mask
1. We start by opening the surround_mask.dds file. Fill the entire layer with #000000. The black color is the base color and can be seen as defining the canvas where the clouds can be rendered upon.
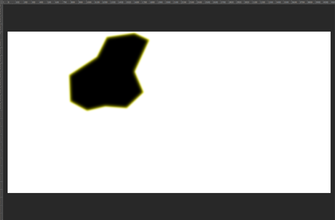
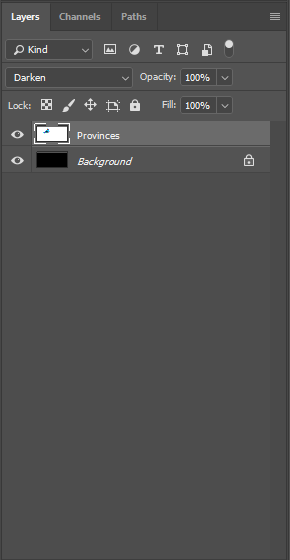
2. Copy the provinces.bmp file and resize it by 50%. Place it at the center of the black layer and make sure the provinces.bmp is in it's own layer. Set the provinces.bmp layer to Darken so you can later in the process use this to paint the contour of the clouds.
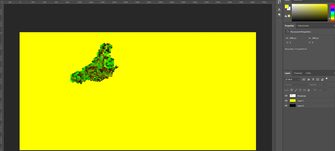
3. Create a new layer on top of the black layer and fill it with #FFFF00. This color defines the light clouds on the map. See image Yellow Layer for the expected result.
4. Select the Eraser Tool(E), set Mode to Pencil. Opacity at 100% and Hardness at 100%. With the yellow layer selected paint over the map to define where you don't want the clouds to appear. If you do it right the provinces.bmp file should no longer be visible in the view as you most likely dont want clouds over the playable area.
5. Now for the heavy clouds you want to first select the yellow layer. With the yellow layer selected and using the Magic Wand Tool(W) set to tolerance 0 and Anti-alias disabled select the yellow part in the yellow layer. Now go to Select in the menu and look for Modify > Contract. I set the Contract By to 40 pixels but you can experiment with this. This defines the distance between the light cloud layer and the heavy cloud layer. Apply effect at canvas bounds should be left disabled.
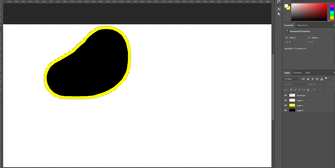
6. Without deselecting anything click Create a new layer in the bottom right of the screen. This new layer should be automatically selected. Now you need to fill the selected area within this new layer with the color #FFFFFF. Use Ctrl+D to deselect everything. See image White Layer for the expected result.
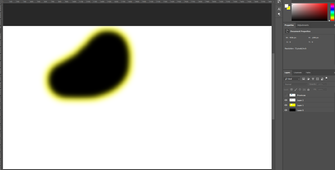
7. To make the transition from nothing to light clouds and from light clouds to heavy clouds lets start by first selecting the yellow layer. With the layer selected go to Filter in the menu and look for Blur > Gaussian Blur. Set the Radius to 40 px. Do the same for the white layer. See image Gaussian Blur for the expected result.
8. The conclude remove the provinces.bmp layer. Select the black, yellow and white layer and merge the layers. Now save the file and start the game to see the result.
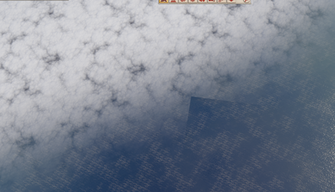
The result is good but some artifacts can be noticed. Such as in the image Square Lines.
This needs to be fixed in the common/defines/graphic/00_graphics.txt. The chapter Cloud Rendering will deal with this.
Cloud Rendering
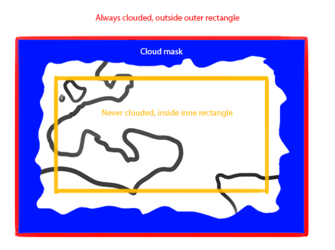
This file is rendered within a defined square. This square also has a central exclusion zone so it is not rendering in the center of the map. The file that controls this square and the exclusion zone can be found in common/defines/graphic/00_graphics.txt. Look for the below code in the file to alter the rendered area of the clouds.
SURROUND_MAP_INNER_RECT = { 2000.0 2760.0 2640.0 3100.0 } #x-start, y-start, x-end, y-end SURROUND_MAP_OUTER_RECT = { -10000.0 -10000.0 20000.0 20000.0 } #x-start, y-start, x-end, y-end
The INNER_RECT defines a square with the set coordinations where no clouds will be rendered. To make it easy you can set this to a very small area at the center of your map to make sure all the clouds are rendered and the rectangle does not interfere with your cloud mask as seen in the image Square Lines.
The OUTER_RECT defines the outer extend of the clouds. I have set this to a ludicrous high number to make sure it always fils the map to the edges.
The coordinates can be looked up when starting the game in -debug_mode via Steam.
Generating a new roads.roads file
To generate a new roads.roads file, type SplineNetwork.GenerateAssets into the console. The file will get saved in the main Imperator folder in Documents under gfx/map/roads. This file then needs to be cut/pasted into your mod’s gfx/map/roads folder.
Before the 2.0 Imperator Rome update the command used to be roads.generateassets, but this doesn’t work in the latest version.
Adding Roads
In the map editor open the Spline Network Strip Tool menu (hotkey: 9), select the Create new anchors tool. Place one anchor for each territory, Imperator’s road anchors are on a territory’s city locations, yet you can place them anywhere inside the territory.
Each anchor has an ID number, and it must match the territory ID number. Edit the Anchor IDs by selecting anchors with the Select and modify anchors tool, and in the Spline Inspector window to the right, click on an anchor to edit its Anchor ID. There is a lock toggle in the Spline Inspector window to prevent further modification.
Select the Create a strip between two anchors tool, click and drag from one road anchor to another to create a road. If both anchor’s id are correct for their territory, the road will be generated following the height of the terrain and shape of the territory. If the road is straight then check that the road anchor IDs are correct, delete the road strip and create a new strip.
Bridges and junctions are generated by the road strip tool. Once you place a road strip, new road strips will attach to it in three-way junctions, so the order in which you place roads is important if you want the generated roads to look a certain way.
The Spline Network Adjustment tool menu (hotkey: alt-9) has a tool to adjust road anchors. Bridges and roads may need to be moved so they match their historic positions. To adjust the road, move the anchors and the road will curve towards the anchor. Add more anchors by selecting two or more anchors and clicking the Add new anchors between selected anchors tool, adjust their position as needed. And as a tip, ancient historical roads are wobbly, without earthworks roads generally move with the terrain height.
Resources
NASA has high quality heightmaps available on their Visible Earth website. Here is a collection of links.
- Downloadable heightmaps. Check the guide for which heightmap to use.
- Guide for heightmaps. For example, the map of Imperator would be on B1 and C1.
- Visible Earth Image Use Policy.
| 文档 | 效果指令 • 触发条件 • 修正列表 • 作用域 • 变量 • 数据类型 • 本地化 • 可自定义的本地化 |
| 脚本 | AI • 建筑 • 宣战理由 • 人物 • 人物互动 • 战术 • 国家 • 文化 • 决议 • Defines • 经济政策 • 事件 • 渊源 • 政府 • 总督政策 • 理念 • 修正 • 军事传统 • 官职 • 行动 • 派系 • 价格 • 人口 • 宗教 • 省份 • Script Values • Scripted Modifiers • 附属国类型 • 科技 • 商品 • 特质 • 单位 |
| 地图 | 地图 • 地形 • 地图定位器 |
| 图形 | 3D模型 • 界面 • 盾徽 • 图形资产 • 字体 • 粒子效果 • 着色器 • 单位模型 |
| 音频 | 音乐 • 音效 |
| 其他 | 控制台命令 • 校验和 • 模组结构 • 错误调试 |
